Image Map

Favorite Projects 2011

Southern Hospitality is hosting a Top Projects of 2011 linky party.  So I thought it would be fun to look back and share my fav's from this year.  I have only been blogging consistently for a few months,  and I have really enjoyed seeing just how many talented ladies are out there! There is never any lack of inspiration in blog land that is for sure.   I wanted to start to blog about my crafts, so I would have motivation finish stuff I start ;) , but... I didn't realize I would make friends along the way!   Everyone that I have come across is so positive and tries to lift each other up, I just love that.   Crafting and turning old stuff into new is my passion in life, and it's really nice to share your love of something with so may others out there!  

So lets go back in time for a minute... These are my favorite projects of the year...

This definitely got me into the team spirit this year! ;) 


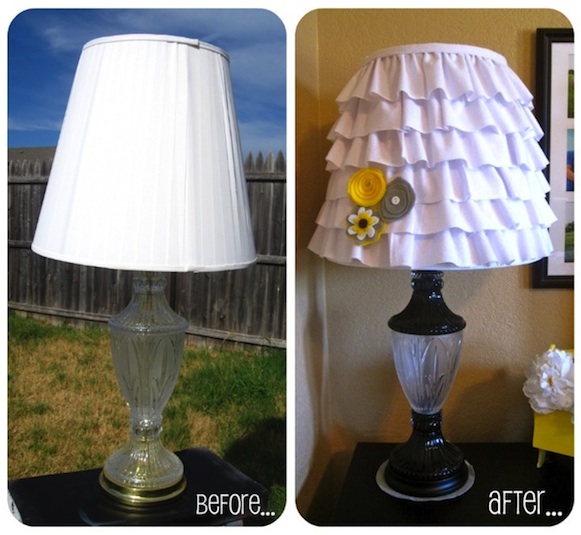
I found 2 of these lamps at a garage sale, with a little paint and fabric on the shade, no more grandma lamp!  I LOVE how these turned! 


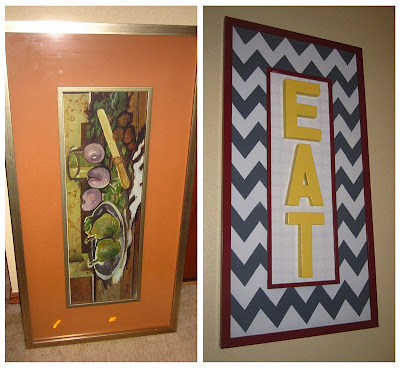
When I saw this picture at Goodwill, I knew exactly what I wanted to do to it.


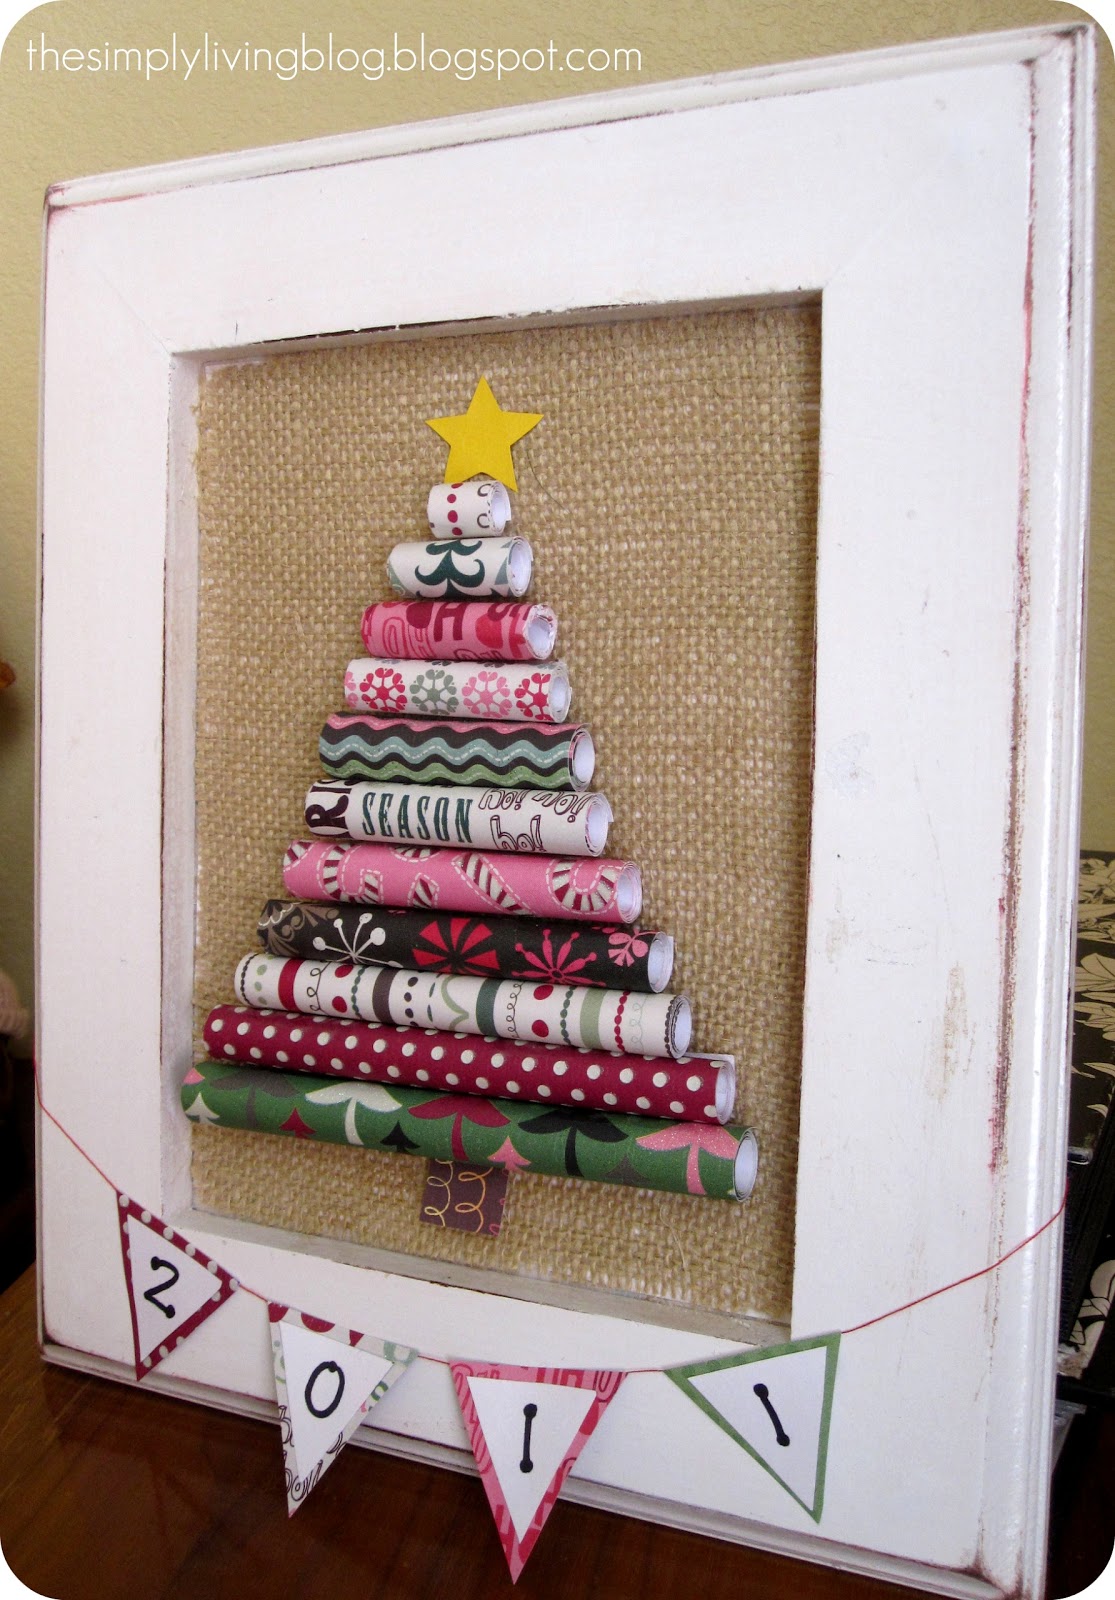
This was one of the easiest projects of the year, just using rolled paper! 


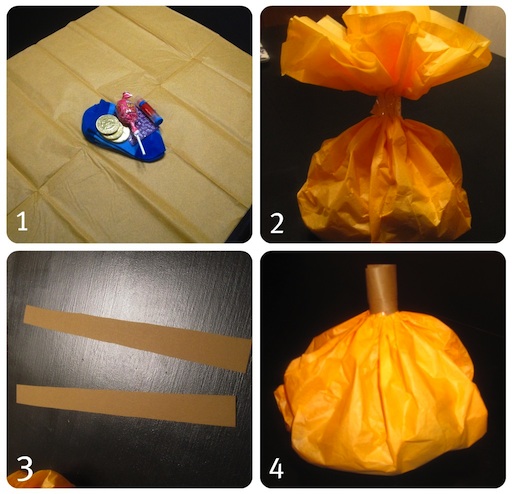
The kids loved ripping these apart on Thanksgiving! 

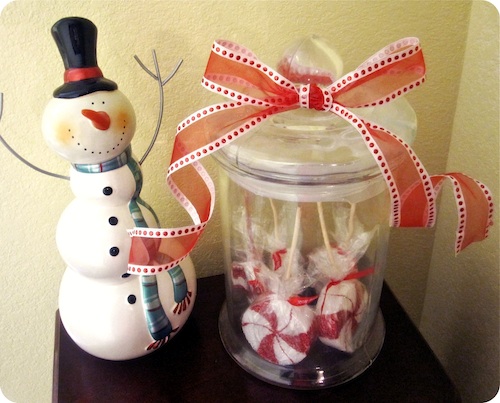
This was for a friend, but will be making myself one next year! 


All of these projects were so fun for me to do, like I said before creating is my passion and I can't wait to do more in 2012!   I wanted to say thank you to everyone who has left a comment or email, it really means a lot when someone gives you props for something you put so much effort into.  Thanks for following along, and see you next year!!! :)

Also linking to
The Blooming Hydrangea

Photobucket
Pin It!

diy monogram frame

Hello everybody!  Christmas came and went too fast for me! I can't believe it is already over, but we had a great time with our family all weekend.  I hope you all had a very blessed time as well!   I meant to post this last minute gift idea BEFORE Christmas, but I decided to just relax and enjoy the time instead.   
But, this is my go to gift, not just for Christmas, if I need something quick, it is such a simple idea and you can change it up anyway you'd like.  And it is very inexpensive, which is even better! 


My little boy has a teacher that comes over every Friday and works with him on his speech, since he was a very late talker.  But now he basically leads the session!  She says not many of the kids she sees get to his level by the time she is done with them, so I am really thankful for that!   I wanted to give her a little something for Christmas and a "thanks for teaching my kid to talk" gift. ;) 


Supplies:
scarpbook paper
frame
an initial letter
glue

1. I got everything from Hobby Lobby, of course, my favorite place.  They have different sizes and shapes of letters there.
2. Trace the glass onto your scrapbook paper and cut it out.
3. Glue pretty side of paper to the glass.  I used modge podge.   You don't even have to glue the paper, you can just put the paper in the frame.  
After that, I Gorilla Glued the letter onto the glass in the middle of the frame.  The total for this was under $8! 


And it looks like this, there are so many variations on this idea, with as many scrapbook paper designs out there, you can match this to any decor!  I think I have made one for everyone in my family ;) 


Photobucket
Pin It!

Christmas Wreath 2.0

A friend of mine asked me where he could find a good wreath, I said well... let me just make you one!

He requested a "sweet bachelor wreath"...  Hmmm I wasn't quite sure what he meant by that ;)  SO I sent him a few I had seen on Pinterest and he chose this style.  I added the black to try and "man" it up a bit.   This was pretty simple, just add a little bit at a time and work your way up until you like how it looks.  That is what I did anyway. 
I really like this look and wish I would have made this kind for myself, I guess we still have a couple weeks before Christmas... ;) 


Pin It!

Cookie Exchange Contenders

I'm going to my first Cookie Exchange this weekend at my friend Natalie's house.  I thought I would put together a list of cookies that I think sound amazing!  I have such a major sweet tooth, so hopefully I can narrow it down and pick one :)

Cookies and Cream Cookies???  Just by the looks of this one, I'd say it's deelish. 


Rolo... Cookie... Wow. 


These are Oreo's covered in white chocolate with peppermint sprinkled on top.   My boss' daughter sent him some last year, he left them at work and I ended up eating them all! LOL  I have to make these at some point this year.  I love taste of the Oreo with the crunchy peppermint bites.  So good.


S'mores Cookie I have pinned at least 7 different kind of s'mores cookies.  I could probably eat a S'more every day.  It's true.  I make them for myself all the time...  This is another cookie I must try.


I just think these are so pretty.  Mine would never come out like that though! 


This one is called Two Toned Cinnamon Cookie from Better Homes and Gardens
Source: bhg.com


Peanut butter pretzel bites. Maybe with a chocolate chip cookie in the middle!


And now how about just some really cute ones that I will never try to attempt!


Source: fancyflours.com


Source: sweetopia.net


I can't wait to try one of these cookies out, and pig out on everyone else's cookies :)
Pin It!

Handmade Ornament ~ (gift idea)

I just love to make gifts for other people.  I guess it's because it gives me an excuse to make something, and then I can get rid of it, instead of it piling up in my guest room! No, but really, I love to create things and I think sometimes it's more special to get something some one has made especially for you, than maybe something from a store.
I made my girlfriends these Photo Ornaments this year.  They were SO easy to do, this took less than one episode of the Real Housewives of BH.  That's about how I have to measure my time, I always do my stuff while I'm watching my shows. ;) 

I opened the picture I wanted to use into Word and then was able to make it small enough to fit into the bulb.  Hobby Lobby has different sizes of clear ornaments. 
Then glued it to scrapbook paper, then rolled it up so it would fit into the hole and stuck it in there.
 I made one last year with all the cousins with Santa in it.  I think its such a cute way to keep memories and you can add to your tree every year! 

Here is a great tutorial from House of Smiths with pictures on how to make it, along with other gift ideas.    I love Shelley from House of Smiths.  She is one of my favorite bloggers!  I have ordered from her and had questions for her and she is always so sweet and personal when she responds.

Anyway, I just love how this Photo Ornament turned out and you should try it too! 

Pin It!

Peppermint Lollipops

My friend gave me the cutest ornament this year, tiny lollipops in a jar.  I LOVE tiny stuff when it looks like food! Doesn't tiny stuff just make you want to squeal?! No, just me? Ok, Anyway ;)... I thought it would be so fun to have a bigger size version to display this year!

I started out with glitter paint, Styrofoam disks ( they come in a 6 pack) and kabob skewers.  
After squeezing and squeezing the glitter paint onto it, it looked like this, my hand throbbing when it was done but it looked cute! ;)  


Once it dried, which did take a LONG time, I wrapped them with plain ol' cling wrap and tied them with a ribbon.  Dollar General has cute ribbon for $1.
I got this large jar from Hobby Lobby to put them in.


I think the total for the Lollipops was around $5 for 6.  These would look adorable as ornaments as well!  I love that snow man too! He is from Pier 1, have you seen their commercials "what speaks to you?", this little guy spoke to me and I just had to get it! :)
Hope you are all having a great time getting ready for Christmas! 


Pin It!

The countdown begins!

It's finally December and time to start the official countdown to Christmas.  I wanted to share this block countdown I made last year.  I explained how I made it here on my Halloween Countdown.
I REALLY need to start shopping!!


Photobucket
Pin It!

Update: crafting competition


I know you all have been on pins and needles wanting to know how the competition is going.  ;)  riiight.
Well I'll tell you anyway, if you're new around here I was competing in One Month to Win It.   I made it through round 1 with my EAT sign, I really love how it turned out and it looks great in our kitchen.   Well, then there was the next round, Deco Art.    I, unfortunately, didn't realize the due date of the next project... After realizing when it was due, it left me one day to create something.   Yeah, if your ever in a craft competition, might want to check to due dates!! Sheesh!
So anyway, I ran to Hobby Lobby the first thing in the morning and picked up supplies I might use.   So this is what I came up with...
I really did want to do something with some scripture in it, something that would be a reminder of what is the most important things in life.

I really love Proverbs 31, I feel like as a mom and wife, my role is to be a keeper of the home and do all I can for my family. 


It says:
An excellent wife, who can find?  For her worth is far above jewels.  The heart of her husband trusts in her and he will have no lack of gain.  She works with her hands in delight.  She extends her hand to the poor.  Strength and dignity are her clothing and she smiles at the future.  She opens her mouth in wisdom and the teaching of kindness is on her tongue. She looks well to the ways of her home and does not eat the bread of idleness.  A woman who fears the Lord, she shall be praised.  Proverbs 31

I used a Deco Art paint writer to write the words on a blank canvas, and inserted it into a frame that I painted.  

Ok, so since I only had one day to finish, I made a lot few mistakes, but just had to keep going!  I do love the message though, and It's not too bad, just don't look to hard at the spelling. :)
It definitely wasn't good enough to get me to the next round,  but I now have a reminder of what kind of a woman I want to be.  And, if I hadn't been "eating the bread of idleness" I would have finished this with time to spare! ;) 

The next round of the competition was Styrofoam, I had a project lined up for this, so I'll post about it later.  


Pin It!

Pumpkin treat favors

I made this last minute pumpkin treat favor for the kids at our Thanksgiving.    I thought it would add a little fun for the kids, get them over the hump until Christmas!  These were so easy and I made a few in no time.    I got all the treats inside in the dollar section of Target, aka, the best section ever.   

Supplies:
Orange tissue paper
goodies/treats 
tape
brown cardstock
1. Put the goodies in the middle of tissue paper.  I used 2 sheets per pumpkin.
2. Gather it up and secure it with tape.
3. Cut a strip of brown paper.  (brown paper bag would be good to use too)
4. Cut off the tissue above the tape, and wrap the stump with the brown paper. I used tape to secure it.
These are made to be ripped open, so they don't have to be perfect! 

There you have a pumpkin, you can add a name or leave it as is.  
I tied green yarn I had around it and made a little name tag. 


I think the kiddos will like getting a little extra something this year, and have fun ripping them open to see what's inside! 

If you don't already have too much to do before Thursday give them a try! :)


Pin It!

Thanksgiving week

Thanksgiving is already here, as much as I want time to slow down it doesn't look like its going to anytime soon.  This year I am attempting some additions to our family's traditional feast.  We have broccoli casserole, green bean casserole, sweet potato casserole, and so on...   Lotsa casseroles going on, but they are all so delicious and I look forward to it all year long.   I'm going to try and make stuffing this year.   This stuffing: "The Best Stuffing Ever" is what it's actually called from the Picky Palate, have you been to her site before?  Check it out!  I get so hungry every time I look at her stuff!!

I've never made stuffing and honestly only had it a couple times, SO I hope this turns out ok... But man it looks good...


I am also going to attempt this wonderfulness...  Cinnamon Roll Pumpkin Vanilla Sheet Cake, wow. 
That name... cinnamon roll..Vanilla.. Cake... all together... it can't be bad! 


I am so ready to EAT and see my family!!  

What are you guys making for Thanksgiving??


Photobucket
Pin It!

Paper Tree

I'm really excited about getting my Christmas decor out, but I am making myself wait until after Thanksgiving.  I need to focus on one Holiday at a time! Christmas seems like it is coming so fast this year, I wish the world would just slow down a bit!!   Although I am waiting to put out my Christmas decor, I can't help but make some things that are just too cute to wait for.   Like this paper tree! 
Right when I saw something similar to this on Pinterest I went straight into my guest craft room and found some christmas paper I bought last year.   This was so easy to make, I turned on the latest Dallas Cowboy Cheerleader episode and was done before it was over.  I love that show by the way.  Maybe because I wanted to be a "DCC" when I was a little girl or maybe just because those girls give me motivation to start working out again.  Not enough motivation to actually go to the gym, but at least I think about it, eh? lol ;)

So anyway...  Here is how easy it was to make.


1. Cut 10 or so sheets of paper, each one about an inch shorter than the previous.
2. roll into a tube using a pen or pencil.
3. Tape the end so it wont unravel.  Stack them up like a tree!
That's it! 
I glued burlap to the inside of a frame and then used tape to secure the paper onto it.  I might use the burlap frame after christmas is over so I didn't want it to be permanent.  
I love bunting, and tiny bunting is even better, so I made a small one for the date, it could say Joy, Merry, or anything, or it's cute without the bunting!


I'm ready to put this out on display but at the same time I just want time to freeze for a second!!  I haven't even started Christmas shopping yet.  I wish we could just do a Zach Morris "time out" and I could get so much done! hehe.  You guys know what I'm talking about right??? Zach Morris, Saved By the Bell???  ;)  Ok anyway...

Leslie Ashe was the original creator of this idea for Echo Park Paper, go here to check out her blog!

This was fun and easy so you should try it out!

Click 


Photobucket

Linking to:

Pin It!

Christmas Wreath

I love the blog UCreate, they are always showing off the greatest tutorials and other projects from around blog land.  If you haven't checked it out, you should! So many great ideas.  She also posts a monthly project that everyone can join in and put their own spin on.  For October it was THIS fall burlap wreath tutorial.

I love how she used burlap, but I already had a fall wreath so I thought I would go the Christmas route instead.   I didn't know until I looked at Hobby Lobby that they have different colors of burlap, I love this red!
This was SO EASY to make, it took no time.   I cut long strips of the burlap, about 4" then wrapped the whole thing with the light color.   Then went back over it with the red.  Let me just tell you, the burlap gets everywhere when you are cutting it! It sheds like crazy!! I was cleaning up red fuzzies for a few days. :)

For the flowers, I used the same technique as you would for a felt flower, the burlap is a little harder to work with, but with hot glue you can get it to stay in place.   The original tutorial shows exactly how she did her flowers.    I put tape on the back of the flowers so I could arrange and rearrange them until I liked it.  

This little Santa was part of my inspiration for the wreath too, he is so cute!

I can't wait for Thanksgiving to be over so I can put it up, I want to let my fall wreath get a good run too :)
U Create
Pin It!