Image Map

String Art Pumpkin Frame

Hello! Happy Fall Y'all! I don't think I'm quite southern enough to say y'all all the time, but I can't resist that little saying ;).  It is really starting to feel like Fall here in Oklahoma and I'm loving it.  For some reason it seems like I am a lot more crafty when the temps start to drop.  So with that, I've been on a spray paint binge.  I recently bought a can of gold metallic spray paint, I was so amazed at how well it covered, I've just been picking stuff up all around the house and just spraying them gold, lol.  
But anyway, back to the topic of this post, Fall crafts and and this String Art Frame!
A few weeks ago Bethany at Pitter and Glink posted an adorable back to school frame with string art and an apple, I thought it was the cutest thing ever. (seriously go check it out, so cute.)
I knew I wanted to make one, and with it being the beginning of pumpkin season, what better shape to use than that?

First, just like Bethany did, I sketched out a pumpkin shape onto paper.  Then nailed small nails along the outline.  After that I randomly strung string around the nails. I did the orange first and then the green for the stem.  I actually had this string on hand from an jewelry project I did a while back.  Love it when I can use stuff in my stash!
Once I had the stringing all strung, I thought it needed something more, so I taped off stripes and painted them a cream color.  I like how it added an element but didn't take away from the pumpkin. Plus stripes are about the easiest thing to do. 
This was so easy, my 4 year old even helped me nail some nails in.  I think it would be adorable with a heart or any other non seasonal shape!
I love string art of all kinds and this mini version really makes my heart skip a beat. :)
I hope its starting to feel like Fall where ever you are, thanks for stopping by! 

Pin It!

DIY "Pull Down" Map

Hi there! I shared my son's bedroom makeover a few weeks ago, and one of my favorite DIY projects for the room was this faux "pull down" map.  I love the trend I have seen around lately using maps, my son loves maps so I knew I wanted to add one in his room.  As I looked for a real working pull down map to buy, I realized how expensive they were, since I had a small budget for this makeover I decided to try and make one that gave the look of the pull down.  This was super easy!

First off I found a map on Amazon, I was beyond thrilled when I found it because of the bright colors that matched the color scheme for the room.  To top it off it was only $6.00! Yes! I got it even if my idea didn't pan out like I planned.  When it came I realized it was pretty thin paper (hence the reason it was so cheap) so I had to be super careful to not crease it as I was working on it.
(I looked for the map I bought but can't find it on Amazon now, but this one is very similar.)

Once the map arrived I bought dowel rods from Home Depot.  I got one 1" diameter for the top and a 1'2" one for the bottom of the map.

I screwed a washer and a 1'2" screw into the ends to give it a little more mechanical feel.  I had to screw it in slowly in order for it not to split the dowel.

After I had the screws in the ends, I took the 1'2" (bottom) rod and marked the middle. Then attached a picture hanger with the screws, to look like a pull down tab.

For the 1" (top) rod I measured one forth of the way from both ends and screwed a picture hanger in, for the map to actually be hung with.

Next, I carefully laid my map out on the ground and lined up the rods across the top and bottom. I had to trim the sides of the map a little to make sure it was the exact same width as the rods.
Then, I used a tacky craft glue to attach the map to the back side of the rods.
When gluing the top rod on, I made sure the picture hangers were towards the back so the screws would be touching the wall when it was hung, that way it would hang flat.
Finally, when the glue dried I attached picture hanger wire to the top two hanger tab things. (Very technical term) ;)  I'm so in love with how it turned out!  It's big and bright and perfect for the space.
I might just do another one for somewhere else in our house because I love it so much! 
Pin It!

DIY Floating Shelves

Hi! Today I am sharing how I made those floating shelves in my sons bedroom makeover I posted about the other day.  This was so simple and so cheap, my two favorite things in DIY. :)
So first off, I went to Goodwill and found a book for .99 cents.  I needed the book to be pretty big but not too big.  The one I found is about 13" x 9".
Once I had my book I headed to the hardware store and bought a 4" L bracket and 1/2" screws.
I got the 1/2 screws because that was about how thick the book I found was.  If you have a thick book you may want to use longer nails.

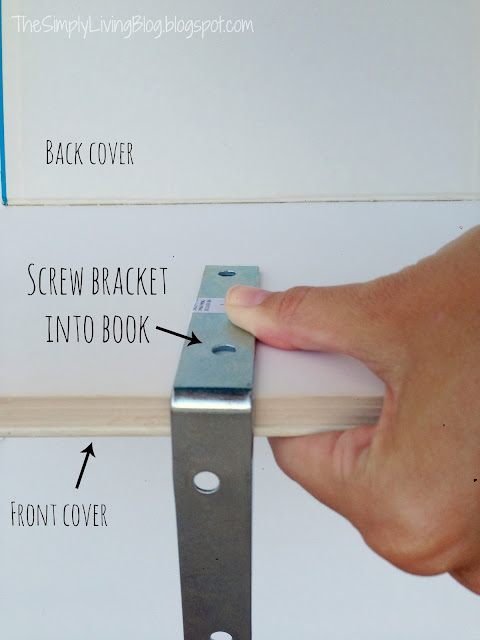
Once I had my materials I was ready to drill! I opened up the back cover of the book and placed the L bracket facing down to the ground. Then just screwed my screws straight into the book.  I had to hold the pages down tightly so the screw would go all the way, but made sure it didn't come out the front cover of the book.
(*note: if I was doing this again I would use two brackets spaced apart for more stability once its on the wall.)    
After I got the bracket screwed into the book I simply used hot glue to attach the back cover and hide the bracket.
When the glue was dry I was done and it was ready for the wall!
I anchored my screws into the wall when I hung them up.   And added all of Carter's favorite books! This is such a fun element, and the fact it was so easy and inexpensive makes it even better! 

Visit thecsiproject.com
Pin It!

Little Boy Bedroom Makeover

Hello!! Wow, it has been so long since I posted last!
I quit my job in the Spring and it seems like I am busier now that I stay home.  It has been an awesome summer staying home with my little boy though, I'd have to say. 
Besides playing Lego's and... more Lego's this summer, I have been working on his bedroom makeover.   It had been decorated the same since before he was born, which is going on 5 years now, and it needed an update to something that fit his personality more. Once I started to brain storm about what he likes the most, the choice was obvious, because he is obsessed with cars... and trucks... and vans... and jeeps. :) As he says, in that order.  Another request from him was his favorite color green and the beach.    It was fun incorporating all of his favorite things, I'm really excited at how it turned out, and Carter loves his "big boy" room too!
So here is the finished room!
So first lets take a look at the before, dark green walls and dark furniture. I had a baseball theme going on that never really got completed. We never went in this room except when Carter slept, and it was like a cave at the end of our house.  This photo was from before he was born, with all of our new baby gear piled up, waiting to be used!

So the first thing we did was paint.  I used Valspar Polar White for the walls. I knew I wanted it bright, I thought about blue, but decided whats brighter than white? lol.  Paint makes such a huge difference.  One of my favorite elements of the room is the painted ceiling, I used Valspar Chopped Chive.    At first I wasn't sure how the room would feel with the ceiling painted.  His room is pretty small and I didn't want it to feel like the ceiling was coming in on him.   But I think it did the opposite, it lifts the room up and actually makes it feel bigger.   I'm glad I just went for it and tried it because it makes such a statement and completes the space. I think Carter was pleased we used his favorite color. :)

Something else Carter loves is maps, and I am in love with vintage pull down maps, so the next thing on the list was to get one.   Trouble was they are so expensive! I came across one on Ebay that would have worked, but then missed the end of the auction.  I thought I was out of luck with the pull down map and then thought, I'm sure I could just make one. This was so easy to make! And cost less than $20. I found the map on Amazon and used dowel rods from Lowe's to look like the pull down part. I love how it came out and it's nice because it takes up so much room on the wall!


The duvet cover and sham are from Pottery Barn and the pillows I made.  I LOVE the car material, Carter actually picked it out and it was really the inspiration for the entire room.  It is from Modern Made Fabric on Etsy.  I used The Shabby Creek Cottage's easy zipper tutorial. I was nervous because I hadn't ever attempted a zipper before, but her tutorial explained it so well and it came out better than I thought it would.  As for the C, I used material from Sew Fine Fabric, and ironed it on with transfer paper.  Both of these material shops on Etsy, have so many cute patterns!
There were two large blank walls in his room so I knew I wanted to do some kind of gallery because it is an easy way to take up a lot of space.  I started with the C in the middle.  I actually made it to look like an old sign letter, I wanted to have something a little more 3D on the wall.
I also wanted to have a place for Cart to hang his artwork, he loves putting it on the fridge so I thought he would like to have it as art in his room.  I found an old metal wall hanging at a garage sale, and painted it white. Since its magnetic he can just switch out his latest masterpieces easily.   


The prints of the cars and truck I found here.  They were free (awesome!) and couldn't have matched any better! I gave the frames a little more detail by gluing two different sized frames together from Hobby Lobby's unfinished wood section.  I love those frames because they are so cheap, you can paint them or leave them as is like I did. 
I also made an instagram photo display from this tutorial. Super easy, just glue some mini clothes pins onto a shadow box, I added some paper to the back to give it a little contrast. 
The print of Cart on the beach I made in Picmonkey.

We use the drawers under Carter's bed for his clothes so I needed easy access to them.  I got this shelf at Ikea, and the crate at Michael's.  I already had the casters so I added them to make it even easier for Cart to move the crate out of the way to get to the drawers under his bed.  It makes perfect storage for extra books and his favorite animals he sleeps with every night.   The orange lamp is from Ikea, and the clock I found at Goodwill.

Across the room from the gallery wall there was the other large blank wall.  He needed storage so this unit from Ikea was perfect.  The baskets are from Ikea as well and let me tell you they hold a ton of stuff!  Seriously it is so easy to just toss stuff in there that doesn't have a home, like marshmallow shooters, robots or other random toys.  They are so deep that even tall awkward shaped toys fit.  And the shelves make perfect parking for all his construction trucks. :)
The mirrors are also from Ikea, I loved them because they kind of reminded me of water, they add a little movement into the room. 

Since I was going with a beachy feel, I used some pictures from our trip to the beach, which is one of Carters favorite times of the year.  I thought this area needed something else besides the frame and lamp, so I took a page out of a vintage Dr. Suess dictionary a friend of mine found at a garage sale.  D being for our last name.  I love that vintage look, I just glued the page onto an old frame backing I had. 

I got this Slug Bug at Ross, it goes perfectly! The book underneath is the book I took the letter D page from.  

I was also really excited to finally use this book shelf I made in my college furniture making class. It has been sitting in or garage for the past 5 years, and I never had the heart to get rid of it because of all the sweat and sawdust that I went through to make it, lol.  I think it is a great touch in here since its kind of a surfboard shape, and the unfinished wood fits right in too.  Little did I know when I was making it, that it would end up in my sons bedroom one day! 

These floating shelves are the last little DIY element I added.  There is a small wall by his door and the closet and I knew I wanted something up there, and I've always liked how fun the invisible shelves were, so I made these myself by screwing a L bracket into the bottom of a book and into the wall. Ill post more later on the steps it took, it was so easy and only $3 a piece. 


I am really happy with how it turned out, and I am really happy I am finally done with it! ;)  
But, most importantly, Carter loves it! 

If this is your first time to my blog, thanks for stopping by! I hope you come back!
Since Google Reader is gone you can follow me on Bloglovin
You can aslo find me on Facebook
or Follow me on Pinterest
OR if you're on Instagram you can follow me there too @kimbo_jangles :)

Pin It!

Easy Teacher Gift Idea

Hello! I have been so sparse on here, like I have said before I do most of my blogging from work, and about a month ago I was able to quit my job.  I am so thankful to God that I am able to stay at home for now! It's definitely an answered prayer.  So that being said I don't have my fancy computer that I had at work and my computer at home is basically slower than a snail, so I will blog as much as I can stand to be on it. ;) 

This week is Teacher Appreciation week, I have seen a million ideas out there for gifts so I thought why not add one more. ;) 
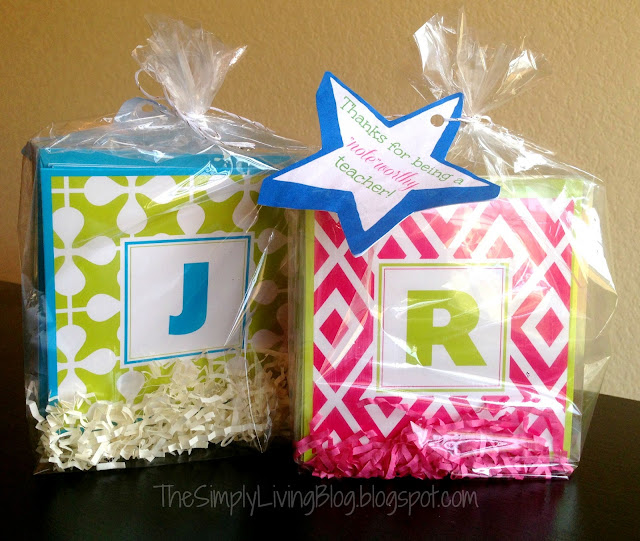
My sister and I were shopping at Michael's and found these adorable note cards.  They had the cutest colors and patterns, and I love anything with an initial.  We thought they would make a perfect teacher gift. To make it a little more festive I wrapped it in a cellophane baggie and added a tag.  
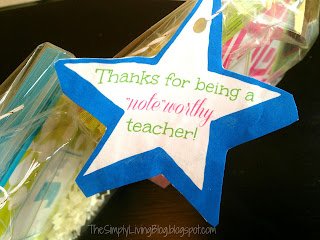
"Thanks for being a 'note'worthy teacher!"
I am really getting into these cheesy puns. LOL


Carter was excited to give it to his teachers! Now we are ready for Summer break! 


post signature
Linking to...
Pin It!

DIY Painted Wall Art

I have slowly been changing the colors in our living room.  It was basically brown and beige, pretty dark and   has been the same since the time we moved in almost 5 years ago.  I am working to make it brighter and cheerier than the dull browns and khakis it had going on.  I have been incorporating whites, blues and other bright colors to do that, and last week I created a piece of wall art that was really easy and helps add the brightness I am looking for!

  Originally, I had these two wooden pieces hanging on either side of a large mirror.  They were just hollow wood with a fleur-de-lis carved into them, I got them on clearance from Hobby Lobby years ago.  
  After seeing this piece of art,  I fell in love and I was inspired to just make my own art using paint and paper to replace the fleur-de-lis.
I didn't want to spend a lot so, instead of buying canvases, I just took the two existing pieces and covered them in a canvas material using my staple gun, and it worked out great thankfully! 


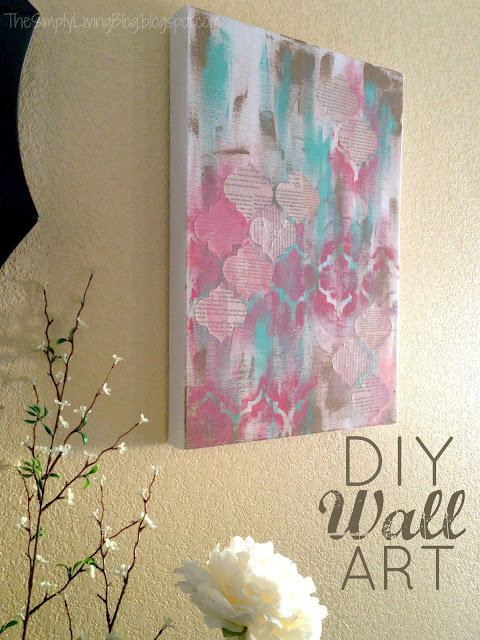
Once I had the pieces covered in the canvas fabric, I brushed on a brown/gold acrylic paint randomly all over, the fabric absorbed the paint pretty quickly so it didn't spread as much as I was expecting it too but I think it helped give it the aged and worn look I was going for, luckily, so I went with it.
After I had the goldish color on, I topped it with a aqua color, randomly covering the whole thing going over the gold in some places. 
Next, I used a quartrefoil stencil I had left over from something else, I placed it asymmetrically on the canvas and painted over it with pink, adding the pink color all over as well.
All of the colors start blending together and fading off each other creating a neat effect.
Finally, I used the same stencil to cut out book pages. I modge podged them on and mixed a tiny bit of paint with the glue so the pages would look like are aged as well, almost like they are being exposed from underneath. 
I also very lightly used sand paper on some parts of the paper.  
I really like how this turned out, and I am not a painter, usually every time I try to paint something on a canvas it looks like my 4 year old did it, lol.  Since this is an abstract piece even mistakes can look like they were meant to be.


I just love these bright colors and they tie in nicely with the scarp paper art I made for the wall across the room from these.


I want to make a few pillows and paint a table then I think I will be finished with the living room.  So hopefully I get those things accomplished before I decide to switch things up again. Ha!

post signature
Pin It!

Mini Spring Cupcakes

Hello! Happy Spring to you! I hope you all had a wonderful Easter!

A couple of weeks ago I made mini cupcakes for my friends baby shower, and I've kind of become obsessed with them. They are so cute and tiny! The perfect size for one bite, I feel way less guilty eating 6 of these bad boys than I do eating a couple regular sized ones.  And lets face it, I always eat more than one regular size cupcake and feel guilty so making these it a winner for me. lol 

Today I'm sharing this easy treat with you.  It is so easy because it came from a box! :) I am not much of a baker, I'll have to say.  I love to try out recipes for cakes and cookies, but they just never seem to be as good as the work and time they took to make them.  So I am not ashamed to say I use the mix straight from the box. :) And for these I used my favorite, which is confetti cake!

I also found some Spring colored sprinkles to top them off. 
What really had me excited about making these is that I realized mini cupcakes are the perfect size for an egg carton.  This makes it so easy to transport and makes an adorable neighbor gift!

I found these cartons in the Easter candy aisle at Wal-Mart for $1, they had marshmallow candies inside, but any egg  carton will work. I added this cute little tag to the top, to make it a little more festive, and so my neighbor didn't think I was randomly bringing her some eggs. ;)  

If you'd like this image you can right click and save as.
I'm so happy Spring is here! I think these bright and cheery cupcakes are a perfect way to celebrate.
I hope it starts feeling like it around here, I am ready for my flip flops! 
Thanks for stopping by, and have a great day!

post signature
linking to these parties...
Pin It!