Image Map

Candy Cane Wreath

Hi! Happy December! If you read my last post about our Elf on the Shelf experience, I have to say it is going a little better, we have put "Simon" out everyday and Carter laughs when he sees him, but still is like, yea I don't want him around. LOL. But, not only did Carter rain on my Elf on the Shelf dreams parade, he isn't really liking the Christmas music I've been playing.  Seriously kid? And I was giving my husband about getting into the spirit this year, and here Carter turns out to be the Scrooge. LOL! No, he's not that bad, I guess he just doesn't want to waste his time listening to Jingle Bell Rock, when he needs to listen to Prince's Purple Rain for the 150th time (for real lol). He is so funny, I never would have thought having a kid would be so entertaining. ;) 
So I digress, I wasn't really planning on making a Christmas wreath this year, but I had a wreath form already. And I found this bright and blingy red ribbon that inspired me.  It didn't require gluing, so that always cuts down on burns time.  Here's what I did...

For this I needed:
A wreath form wrapped in white fabric
red ribbon
stems and picks in various shapes from Hobby Lobby
straight pins 
I started this wreath out with THIS one I made last summer.  The fabric was pinned on so I just took it off and it left me with a white base.  
 I pinned the beginning of the ribbon to the back of the wreath then wrapped it tightly around,  then just pinned it in place. 

Next I stuck the stems and picks under the ribbon, which was tight so I didn't need any glue or pins for this, they just stayed in place. 

Once I got my sticks how I liked, I used another red ribbon (this time mesh, I got it for $1 at Dollar General) and tied it into a bow. Then pinned it onto the wreath.   I kind of just tucked and pinned until it looked good. 

That's it! 

I LOVE it! And since it's pinned I can just take the embellishments off and reuse the white base after Christmas.

So, I think that is all for my DIY Christmas decorating, now onto presents! :) 
Thanks for checking it out, have a great week!


Pin It!

Chalkboard Christmas Countdown


Hello there! I am really glad we had a week after Thanksgiving before the first of December, anything to stretch the Christmas season a little further.  Every year I want to make an advent calendar, I think they are so cute and there are so many creative ways to make them.  But, since I'm trying not to do too much this year, I made this simple chalkboard Christmas Countdown!  I just LOVE chalk art, I had so much fun this summer with Carter's sidewalk chalk, more fun that him probably. :)  
I have been wanting to make a chalkboard for our house for a while, and then I thought that making a chalkboard countdown would be easy and cheap, which it was because I had all the supplies on hand. Oh yea! 

I used, a frame, chalkboard paint, and a white paint pen.
I painted the glass of the frame with the chalk paint, doodled the "Days until Christmas" onto it and that was it! 
First I wrote the letters on a piece of paper just to practice and see how I wanted them to look.  Then used a pencil to lightly draw them on the chalkboard for a guide.  I like making letters like this because you don't have to be that precise. 
I love how it turned out!
So we also started Elf on the Shelf this week, I have been dreaming of the day we could do it, since Carter was still a little to young to get it last year.  I had envisioned all the silly little set ups to do and Carter cracking up at the little Elf.  I hyped it up to Carter, saying Santa has a special book for him, etc.  I was so excited I just knew he would love it!
Well... as I was half was through the book, Carter looks concerned and shuts the book, saying I don't like this book and shaking his head.  
I'm like, why he's Santa's helper? 
Then his lip curls up and he starts to cry, saying I don't want him here! 
Jamie and I started laughing just because I had built it up so much, and Carter was the exact opposite of excited about it. Poor guy.
 My Elf on the Shelf dreams were crushed! LOL 
I guess the thought of a tiny Elf creeping in your house is a little scary, for Carter at least, I'm pretty sure he's the only kid in America that doesn't like it!  What I really think is that he just didn't want the Elf to tell Santa on him. Which makes it even more funny.
I just knew it would be a great bribing tool fun thing to do until Christmas! he he :)


Photobucket
Pin It!

Favorite Christmas Projects

Hi! I hope you all had a wonderful Thanksgiving, I did, and now I am so glad the Christmas season is here! This year will be so much fun with Carter since he really knows about Santa and can really get into the excitement too.  It will be so fun to see his face light up on Christmas morning!  I am trying not to go overboard and stress about having the cutest Christmas decorations or crafts or gift wrap or neighbors gift.  I feel like last year I let all of that take priority over the real reason for the season.  It can get to be too much and then it's over without even enjoying the moment.  So this year I am determined to step back and not care so much about the material things.  Carter is only this age once and I want to make it as special as I can for him and our little family!  
But... Since I did go a little overboard last year, here are my favorite projects... :) 


These are all really easy and fun to do! Just don't get caught up in trying to do too much unimportant stuff this year, like I did last year!  I hope you all enjoy the little moments this Holiday Season! 


Photobucket
Pin It!

No Sew {Turkey Flag}

Hello! Can you believe it is already November?? And a week into it at that.  I cannot, this year has flown by, but I am really excited about the holidays coming up!  I'm ready to put my Christmas decorations up, but I don't think my husband would be up for that yet, so I'll try to wait just a couple more weeks. :) 
So onto my latest project!  I may have turned my love of making wreaths into something else... garden flags! lol Yes, this is another post about a garden flag, I'm sorry, I know its really redundant, but this one is so cute I just had to share! :) My mom wanted me to make her a Fall one like the one I did here, but I had something else in mind.  Since she is hosting Thanksgiving for our family this year I thought a turkey would be super cute! 
These flags are SO SO easy to make I'm telling you!  I know I say that about everything I make, but seriously this is simple as it gets.  And for this one I used up the rest of the scraps I had from my from my Fall tree one.  I love using up scraps! I had the burlap, so all I needed was a piece of felt for the body, that was .25 cents! 

For this one I cut a piece of burlap about 12 inches wide, then cut 7 pieces of fabric for the feathers.  I cut one piece then used it as a template for the other 6 pieces.  
After that, I cut a body shape out of felt.  I didn't sew a single thing on this.  I used fabric glue for everything, making it even easier!! I put glue along the edges on the back side to keep it from fraying and used a paint brush to paint on the glue to the fabric pieces.  
Finally, I added little eyes, beak, and legs out of fabric too.  I love how he looks googly eyed, my husband said he looked like a South Park character, lol.  I think he is super cute!! :) He kind of reminds me of a Shawn the Sheep character, have you seen that? If you have kids you should watch it on Netfilx, it's claymation and it cracks me up! 


Just to let you know how strong the glue is, the first garden flag I made held up really well, in rain and everything.   The possibilities are endless for garden flags, especially if you have fabric scraps to use up!  I'd love to know if you try to make one.
Like I said before I can't believe it's almost Thanksgiving, but I am so excited for all the festivities. Gobble Gobble, I hope you are having a great start to the Holiday season!  

Craftomanic ~  The DIY Showoff ~  Under the Table Dreaming ~ Today's Creative Blog ~  Tip Junkie ~  Blue Cricket Designs ~  Organize Your Stuff Now ~  Shabby Creek Cottage ~  The Crafty Blog Stalker ~  See Vanessa Craft  ~ Southern Lovely ~ Grits and Giggles ~ Thrifty Decor Chick ~ It's Overflowing ~ Creatively Living ~ 52 Mantles ~ 30 Handmade Days ~ The CSI Project ~ The DIY Dreamer

Pin It!

Painted Silhouette ~ and a product road test

A few weeks ago Linda, from Craftaholics Anonymous, put out a request on Facebook for "Craft Product Road Testers".   The request was something like "do you like free craft products, crafting, or showing off crafts?", so yea... that basically sums me up... so I immediately applied!  :) I didn't think I would ever get chosen, but I actually did! Yay!
I was super excited because the product for review was decoupage, besides hot glue, it is one of my most used mediums in my crafting projects.  She sent us 4 bottles of the medium, 2 matte and 2 gloss, we picked either gloss or the matte for our project.  I picked matte, so I needed to do 2 projects using the 2 different matte bottles then review the differences/similarities.   Did you get all that?? lol You can read all about it on Linda's site here.  The brands are kept a secret until after everyone submits their reviews.  

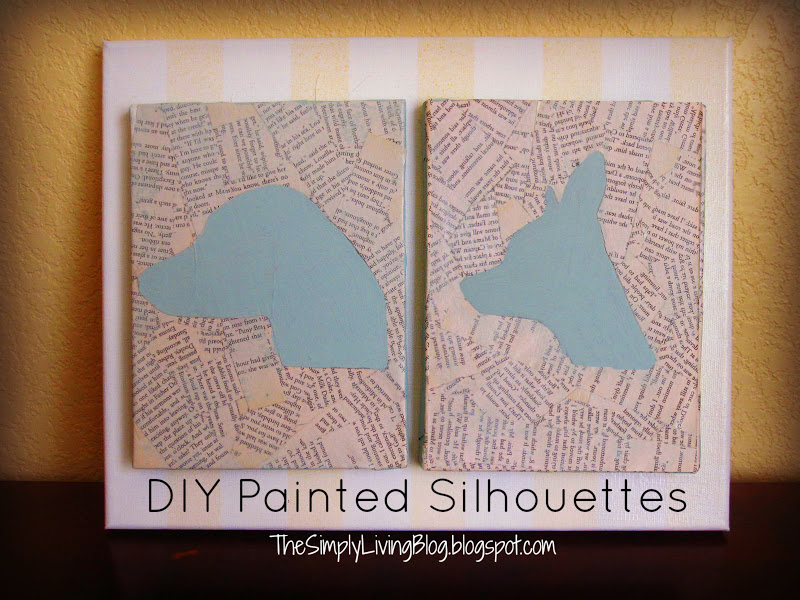
So onto what I did! I am in the process of re-doing my living room wall, I wanted to incorporate more family photos than what I had, and that means our dogs too, of course. :) I have had an idea of doing a dog silhouette for a long time, but haven't really gotten around to it, but since I needed 2 projects and I have 2 dogs I thought Yes! This is a perfect time to get it done.

So, another suggestion Linda had for this test was to use things already in your craft stash, which I loved, because I need any excuse to use up all the stuff I have in my craft closet.  The only thing I did buy for this were the 2 small canvases, which I actually just now thought that I could have used cardboard and then I wouldn't have had to buy anything. Oh well, maybe you can do that if you try this project out! :)   
So onto the supplies:
Large canvas
2 small canvas' (or cardboard) 
book pages
decoupage
paint 
paint brush

 I didn't take step by step pictures because this was VERY very easy to do. And it didn't even require a cutting machine,  Score! 
First, I cut 1 inch strips of book pages. And used the decoupage medium to glue them randomly onto the small canvas.  I used one bottle of the medium on one small canvas and the other bottle on the other small canvas.

Next, I took a picture of my dog's profile and printed them out on regular copy paper and cut them out around the head.  I decoupaged these over the book pages. 
  
Once it was dry, I just went over the printed picture with acrylic paint.  

Then I glued the finished canvases to a larger canvas so that they would be more like one piece of art.  I added stripes to the larger canvas to match this one I already have in our living room as well.
And... done! So easy! 

I didn't really go into this thinking I would paint the silhouettes, I was just going to leave the photo as is, but in black and white, I thought it would look old and newspapery, but it really just looked weird, ha.  So,  as I was painting the sides of the small canvases with a blue to add some color, thinking that would make it look less weird. I thought, Hello! Just paint over the pictures! That made a huge difference, and I loved how it turned out.   I was so stoked because I didn't have to use any kind of a stencil or cut out, that would have added another step in the process and the less steps the better, am I right?

Although it's kind of funny because the dog on the right's head is actually about 4 times smaller than our other dog. But if I would have done the proportion right, his silhouette would be like the size of quarter. No really, he's that small. LOL

So onto my thoughts on the craft mediums, the 2 matte bottles I selected were labeled with a red top and an orange top.  I used the orange bottle first... this is our dog Weezy he's lazy and scared of his shadow, but we love him.

And I used the red bottle on the second... This is Marty, he has pencils for legs and only wants you for your warm lap to sit on, but we love him too ;)

Overall each of these were pretty similar.  They both had a good matte finish, but side by side I thought the red bottle had a slightly more matte look, not much but in comparing the two it was.  
The major thing that I did notice is that I only used 1/4 of the orange bottle and ended up using half of the bottle of the red bottle.  It seemed when I was using the orange bottle I didn't have to keep dipping my paintbrush back in the decoupage like I did the red bottle.   That's kind of a big difference, so if I had to choose one or the other I would choose the orange, just for the fact it would last longer.  
This was so fun getting to compare 2 different mediums and seeing the differences/similarities.  Thank you so much, Linda, for letting me road test these products out! 

If you have any questions about this project just let me know! 

Linking up here...
Craftomanic ~  The DIY Showoff ~  Under the Table Dreaming ~ Today's Creative Blog ~  Tip Junkie ~  Blue Cricket Designs ~  Organize Your Stuff Now ~  Shabby Creek Cottage ~  The Crafty Blog Stalker ~  See Vanessa Craft  ~ Southern Lovely ~ Grits and Giggles ~ Thrifty Decor Chick ~ It's Overflowing ~ Creatively Living ~ 52 Mantles ~ 30 Handmade Days ~ The CSI Project ~ The DIY Dreamer

Pin It!

Halloween Garden Flag

I shared this Halloween Flag over at Delightfully Noted last week, I thought I would share it here too in case you missed it, my posts have been pretty light this month! I guess I have been busy! I did take the time to make this flag, which was really no time at all! See...

I just love the way a little garden flag can add a some personality to the front of your house.  This one didn't take long to make, with just a few simple steps.

First, I cut a piece of material 12" by 21"

Then I sewed around the edge of the fabric and frayed them out. 

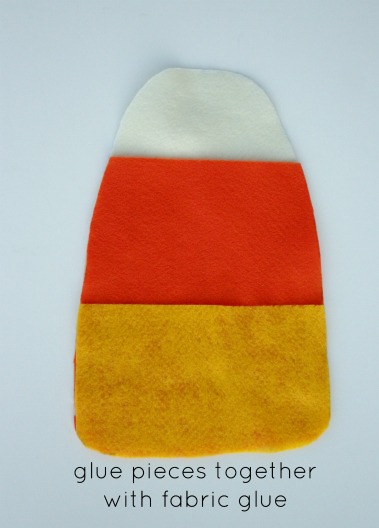
Once I had the fabric done, I cut out a candy corn shape from felt.  I lined up the felt and kind of just sketched a shape with a sharpie then cut it out.  
After I had the shape cut out and lined up the way I wanted, I used fabric glue to glue the pieces together. Fabric glue holds up so well, I would have never thought, but once it dries, its going to be there a while! 

Then I cut three pieces of felt about 3" long, and glued the top and bottom to the back side of the fabric, in order to insert the flag rod through.

Finally, I used the fabric glue again, to attach the candy corn to the fabric, then hung it up! That's it! So simple, and there are so many variations you could to too, I thought a ghost or an owl would be cute, maybe a witches hat.  Not only is this easy, but it's really inexpensive as well.  Sometimes the flags you buy at the store can be pricey, but this is cheap and one of a kind! :) 

I love the gray chevron against the bright orange and yellow.  I think a giant candy corn says "Hey, this house is ready for Halloween!" :) I've had this hanging for a couple weeks, and even though it's fabric and felt, it is holding up nicely in the weather! 

I think Garden Flags are my new "thing" lol, so you know I'll be making a Thanksgiving and Christmas one! :)

There's still time for a few more Halloween Crafts, check out Delightfully Noted's Wicked Craft Week for some easy and cute ones! 
Thanks for stopping by! 

Linking up to these parties...


Pin It!

Wicked Craft Week {Delightfully Noted}

Hi friends! Today I am sharing a fun Halloween craft at one of my favorite blogs Delightfully Noted.  She is hosting a week long Wicked Craft Week with some super talented people, I was so excited that I was asked to even be in the same line up as these ladies! So far there have been some amazingly cute and simple Halloween craft ideas, go here to check them all out, you wont be disappointed!! :) 


Photobucket
Pin It!