

Hello!! Wow, it has been so long since I posted last!
I quit my job in the Spring and it seems like I am busier now that I stay home. It has been an awesome summer staying home with my little boy though, I'd have to say.
I quit my job in the Spring and it seems like I am busier now that I stay home. It has been an awesome summer staying home with my little boy though, I'd have to say.
Besides playing Lego's and... more Lego's this summer, I have been working on his bedroom makeover. It had been decorated the same since before he was born, which is going on 5 years now, and it needed an update to something that fit his personality more. Once I started to brain storm about what he likes the most, the choice was obvious, because he is obsessed with cars... and trucks... and vans... and jeeps. :) As he says, in that order. Another request from him was his favorite color green and the beach. It was fun incorporating all of his favorite things, I'm really excited at how it turned out, and Carter loves his "big boy" room too!
So here is the finished room!
So here is the finished room!

So first lets take a look at the before, dark green walls and dark furniture. I had a baseball theme going on that never really got completed. We never went in this room except when Carter slept, and it was like a cave at the end of our house. This photo was from before he was born, with all of our new baby gear piled up, waiting to be used!

So the first thing we did was paint. I used Valspar Polar White for the walls. I knew I wanted it bright, I thought about blue, but decided whats brighter than white? lol. Paint makes such a huge difference. One of my favorite elements of the room is the painted ceiling, I used Valspar Chopped Chive. At first I wasn't sure how the room would feel with the ceiling painted. His room is pretty small and I didn't want it to feel like the ceiling was coming in on him. But I think it did the opposite, it lifts the room up and actually makes it feel bigger. I'm glad I just went for it and tried it because it makes such a statement and completes the space. I think Carter was pleased we used his favorite color. :)
Something else Carter loves is maps, and I am in love with vintage pull down maps, so the next thing on the list was to get one. Trouble was they are so expensive! I came across one on Ebay that would have worked, but then missed the end of the auction. I thought I was out of luck with the pull down map and then thought, I'm sure I could just make one. This was so easy to make! And cost less than $20. I found the map on Amazon and used dowel rods from Lowe's to look like the pull down part. I love how it came out and it's nice because it takes up so much room on the wall!

The duvet cover and sham are from Pottery Barn and the pillows I made. I LOVE the car material, Carter actually picked it out and it was really the inspiration for the entire room. It is from Modern Made Fabric on Etsy. I used The Shabby Creek Cottage's easy zipper tutorial. I was nervous because I hadn't ever attempted a zipper before, but her tutorial explained it so well and it came out better than I thought it would. As for the C, I used material from Sew Fine Fabric, and ironed it on with transfer paper. Both of these material shops on Etsy, have so many cute patterns!

There were two large blank walls in his room so I knew I wanted to do some kind of gallery because it is an easy way to take up a lot of space. I started with the C in the middle. I actually made it to look like an old sign letter, I wanted to have something a little more 3D on the wall.
I also wanted to have a place for Cart to hang his artwork, he loves putting it on the fridge so I thought he would like to have it as art in his room. I found an old metal wall hanging at a garage sale, and painted it white. Since its magnetic he can just switch out his latest masterpieces easily.

The prints of the cars and truck I found here. They were free (awesome!) and couldn't have matched any better! I gave the frames a little more detail by gluing two different sized frames together from Hobby Lobby's unfinished wood section. I love those frames because they are so cheap, you can paint them or leave them as is like I did.
I also made an instagram photo display from this tutorial. Super easy, just glue some mini clothes pins onto a shadow box, I added some paper to the back to give it a little contrast.
The print of Cart on the beach I made in Picmonkey.

We use the drawers under Carter's bed for his clothes so I needed easy access to them. I got this shelf at Ikea, and the crate at Michael's. I already had the casters so I added them to make it even easier for Cart to move the crate out of the way to get to the drawers under his bed. It makes perfect storage for extra books and his favorite animals he sleeps with every night. The orange lamp is from Ikea, and the clock I found at Goodwill.

Across the room from the gallery wall there was the other large blank wall. He needed storage so this unit from Ikea was perfect. The baskets are from Ikea as well and let me tell you they hold a ton of stuff! Seriously it is so easy to just toss stuff in there that doesn't have a home, like marshmallow shooters, robots or other random toys. They are so deep that even tall awkward shaped toys fit. And the shelves make perfect parking for all his construction trucks. :)
The mirrors are also from Ikea, I loved them because they kind of reminded me of water, they add a little movement into the room.

Since I was going with a beachy feel, I used some pictures from our trip to the beach, which is one of Carters favorite times of the year. I thought this area needed something else besides the frame and lamp, so I took a page out of a vintage Dr. Suess dictionary a friend of mine found at a garage sale. D being for our last name. I love that vintage look, I just glued the page onto an old frame backing I had.
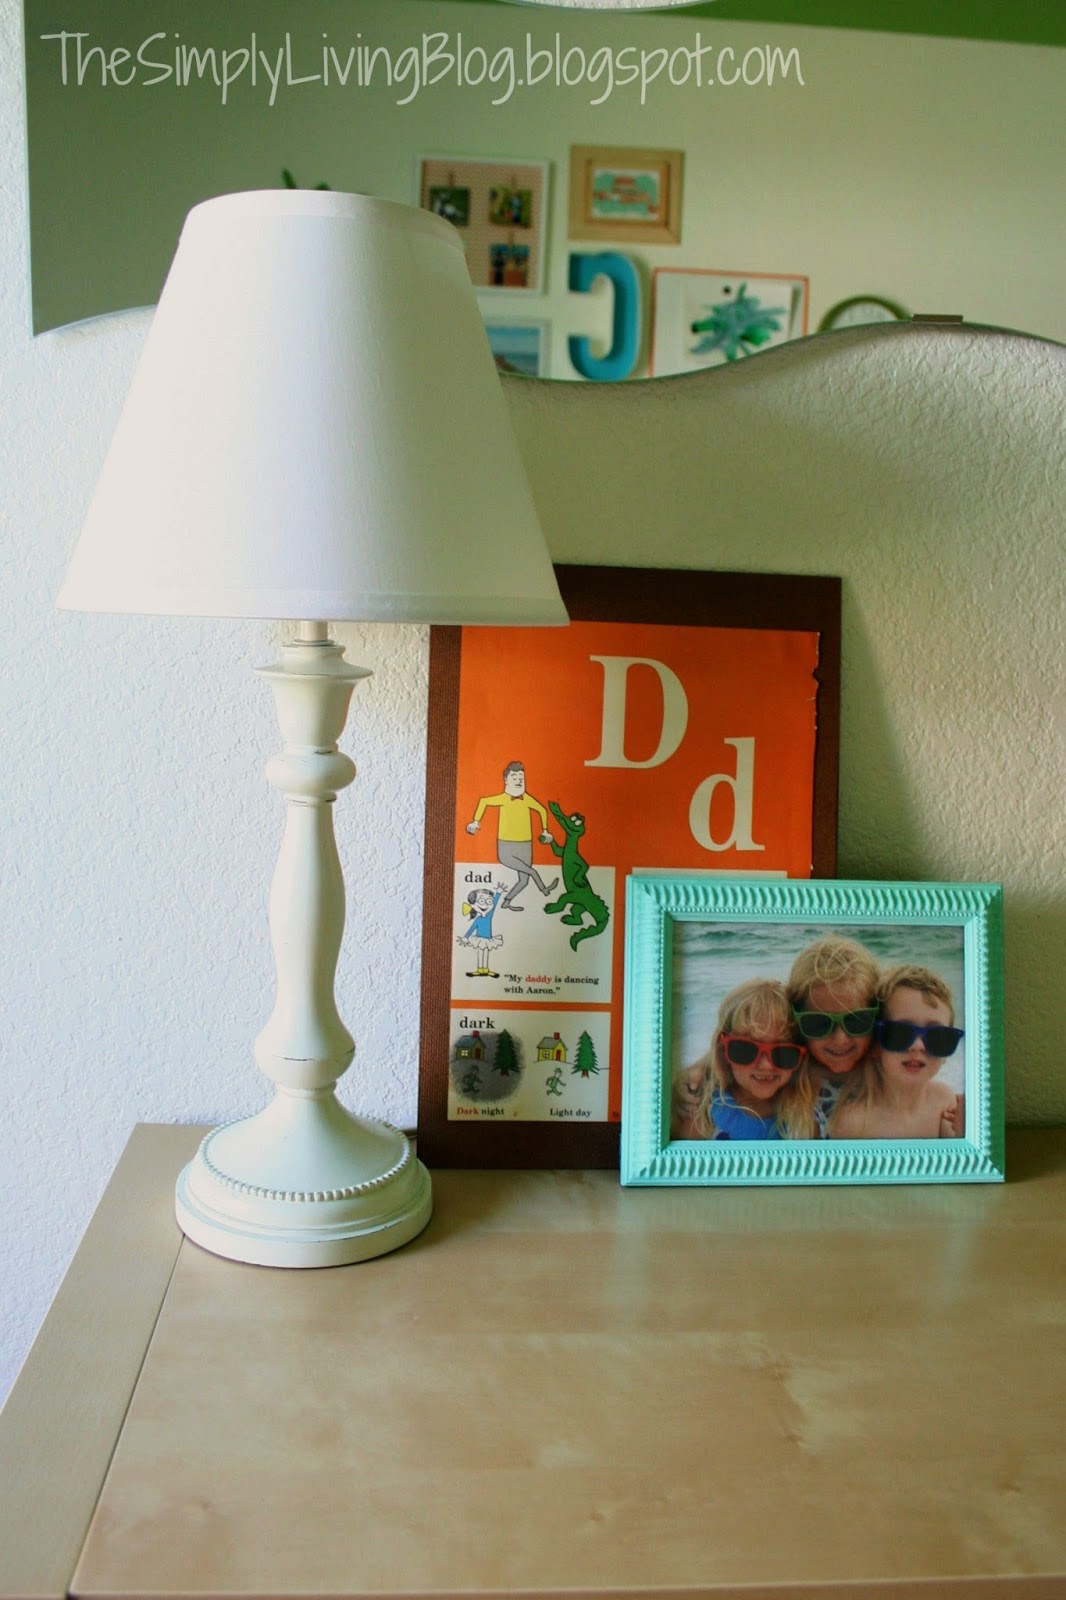
I got this Slug Bug at Ross, it goes perfectly! The book underneath is the book I took the letter D page from.

I was also really excited to finally use this book shelf I made in my college furniture making class. It has been sitting in or garage for the past 5 years, and I never had the heart to get rid of it because of all the sweat and sawdust that I went through to make it, lol. I think it is a great touch in here since its kind of a surfboard shape, and the unfinished wood fits right in too. Little did I know when I was making it, that it would end up in my sons bedroom one day!

These floating shelves are the last little DIY element I added. There is a small wall by his door and the closet and I knew I wanted something up there, and I've always liked how fun the invisible shelves were, so I made these myself by screwing a L bracket into the bottom of a book and into the wall. Ill post more later on the steps it took, it was so easy and only $3 a piece.

I am really happy with how it turned out, and I am really happy I am finally done with it! ;)
But, most importantly, Carter loves it!

If this is your first time to my blog, thanks for stopping by! I hope you come back!
Since Google Reader is gone you can follow me on Bloglovin
Since Google Reader is gone you can follow me on Bloglovin
You can aslo find me on Facebook
or Follow me on Pinterest
OR if you're on Instagram you can follow me there too @kimbo_jangles :)

Linking up to these parties
Craftomanic ~ Under the Table Dreaming ~ Today's Creative Blog ~ Tip Junkie ~ Organize Your Stuff Now ~ Shabby Creek Cottage ~ The Crafty Blog Stalker ~ See Vanessa Craft ~ Southern Lovely ~ Grits and Giggles ~ Thrifty Decor Chick ~ It's Overflowing ~ Creatively Living ~ 52 Mantles ~ 30 Handmade Days ~ The CSI Project ~ The DIY Dreamer
~ Tatertots and Jello

I love his room so much! I just feel happy looking at it! Carson is growing so fast, we're having to think about redoing his room again soon and I absolutely love the minimalistic orange and green you've gone with.
ReplyDeleteXO
Everything looks so great! Really love the painted ceiling.
ReplyDeleteHoly cuteness Kim! I love it. I can't even pick a favorite bc I adore everything from the duvet, to the colors, to the map AND that shelf you made is perfect for the room (we never made anything that elaborate in wood shop!) Carter is a lucky boy.
ReplyDeleteI like it co much your decoration!great details and fresh colors!Well done!
ReplyDeletehugs
http://freestilcreatingbyvilly.blogspot.gr/
Super darling, you did a great job. Mind me asking you how you did the cute book shelves. Thanks for linking up. Hugs, jen
ReplyDeleteIt is simple and cheery. I love it.
ReplyDeleteSuper cute Kim! LOVE.
ReplyDeleteThis is too cute! I love all the colors and seeing the toys. Some kids rooms are so sterile that I wonder how a kid has fun in there. lol Love the books on the floating bookshelf. Clever! :)
ReplyDeleteVery cute! I love the green ceiling!
ReplyDeleteI love the bookshelf you made!! I want one. Love the room, all of it. The map really pulled me in though.
ReplyDeletelove love that you put green on the ceiling! a great pop of color!
ReplyDeletePerfect timing! I'm doing both my boys' bedrooms right now. My youngest is Carter =D.
ReplyDeleteI love this room! It's so cute but appropriate for a growing boy. I've also found I'm more busy now that I'm staying at home with the kids!
ReplyDeleteI'm stopping by from Share Your Creativity (#21 Easy DIY Photo Canvas)
Oh, it's so cute! I love all the little touches. I especially love the Slug Bug.
ReplyDeleteVery nice - love the colours and the car theme. I have started redoing my son's room too - he is 11 now - and while it won't have a theme, I am looking at colour combinations - loving yellow and orange right now! Your room was a great inspiration!
ReplyDeleteThis is sooo adorable! I love that you kept away from blue. I also like how you went with softer tones of the green and orange instead of straight from a crayola crayon box. Way to be creative and original!
ReplyDeleteThanks for sharing!
Amy @ http://delineateyourdwelling.blogspot.com
Awe! What a sweet room for your little guy, Kim! I bet he spends a lot of time in there...so many fun ideas! I'm including a link back in tomorrow's DIY highlights! Thanks for linking up your awesome work! :)
ReplyDeleteI love the colors and bright cheery feel. As a mom to 3 boys, I'm always looking for great ideas for boy's rooms.
ReplyDeleteso fun!! i love that green ceiling!
ReplyDeleteSuch a cute room Kim! I have been working on my son's bedroom too.. but then we decided to move my younger son in with him to free up a bedroom - and now we are "re" working on their room! It may never be finished! Thanks so much for the great inspiration:) Pinning!
ReplyDeleteJust AWESOME! I love that you weren't afraid to paint the ceiling! Makes all the difference.
ReplyDeleteSuch a great makeover. I love the bookshelf you made in college! And the floating shelves are very cool!
ReplyDeleteThis is awesome!!! So many great ideas in this post that can easily be modified and adapted for use in a girls room. Love the variety of the gallery wall. The repurposed metal sign into art display is really clever.
ReplyDeleteI love every little detail! Great job!
ReplyDeleteHi..I am redoing my son's bedroom with maps too. I love your design! Can I ask which map you ordered from Amazon? I just looked and there are lots of choices. I love the one you picked!
ReplyDeleteThanks!! Staci :)
Can you let me know exactly how you did the map? I have two maps I would love to hang in my son's room, but a little unsure how to do it! I love what you have done with this room!
ReplyDelete